Statements are typically generated for Balance Forward (B/F) and Open Item (O/I) customers. However, statements can be run for all customers, but HAVE to be run for Balance Forward and Open Item customers to see a bill. Click here to display a sample of an Statement.
Reminders can also be run for all customers - these are statements based on an aging bucket - used for 'late notices'. You can generate them for customers that are 60 days old, etc where the Statement option does not have an aging selection.
![]() If this is your first time printing statements (or if you have made changes to your statements), you should perform a test run of the Statements before ordering a large stock from your printing company (some may even give you a small quantity to test). Since printers and hardware vary and can affect the printing of forms, it is VERY IMPORTANT to line up your statements and verify their format. For samples of actual forms to give your printing company, please contact our Support Services Department at 800-860-4327.
If this is your first time printing statements (or if you have made changes to your statements), you should perform a test run of the Statements before ordering a large stock from your printing company (some may even give you a small quantity to test). Since printers and hardware vary and can affect the printing of forms, it is VERY IMPORTANT to line up your statements and verify their format. For samples of actual forms to give your printing company, please contact our Support Services Department at 800-860-4327.
If you run multiple TYPES of statements (Long statements, postcards, mailers, etc), please make sure your Report Form file has been updated with the appropriate option on the i-Pak values screen.
The options for a Test run are the same as for Actual Statements, but charges will not be marked as billed.
From the Billing Menu, select Actual Billing - Statements option #15 (for a 'test' run, select Pre-Processing Statements with Auto Charges option #7, or #4). A continue window will be displayed.
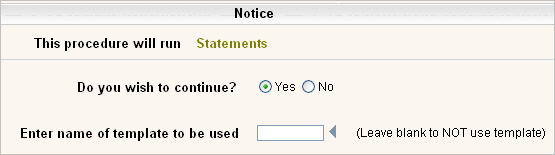
Click on Yes to put a ![]() in the circle to continue, or No to cancel. If you have previously run Statements and created a Template, you can enter the Template name here. The Template selections will be filled in to the following Company & Cycle selection screens automatically. Click the
in the circle to continue, or No to cancel. If you have previously run Statements and created a Template, you can enter the Template name here. The Template selections will be filled in to the following Company & Cycle selection screens automatically. Click the ![]() to display your choices for Template names.
to display your choices for Template names.
Click or press ![]() to continue. The Company Selection screen will be displayed.
to continue. The Company Selection screen will be displayed.
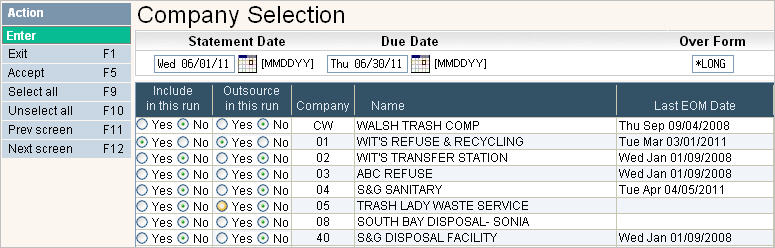
In the Statement Date field, fill in the date you would like to show at the top of the Statements. Type in the date as a number (the / are not needed), or click the Calendar icon ![]() to select the date.
to select the date.
Click on Yes to put a ![]() in the circle to include the company, or No to not include the company. You can click on
in the circle to include the company, or No to not include the company. You can click on ![]() to put a
to put a ![]() in the Yes column for all companies or
in the Yes column for all companies or ![]() to put a
to put a ![]() in the No column for all companies.
in the No column for all companies.
If you would like a Due Date to appear on the Statement, enter the date they are due in the Due Date field. If you leave this field as 000000, then no Due Date will print.
The Over Form field allows you to easily override the Form Type that is set in Report Form Setup. If you typically generate PCARD (post card) type of Statements, but this time want to print Long Form Statements, just key in *LONG in the Over Form field and you will get Long Form Statements instead of Post Cards. Valid options for this field are: *LONG, *SHORT, *MAILR, *PCARD and blank (to use the RFS default).
Click the ![]() button or press F5 to accept and continue. The Cycle Selection screen will be displayed.
button or press F5 to accept and continue. The Cycle Selection screen will be displayed.
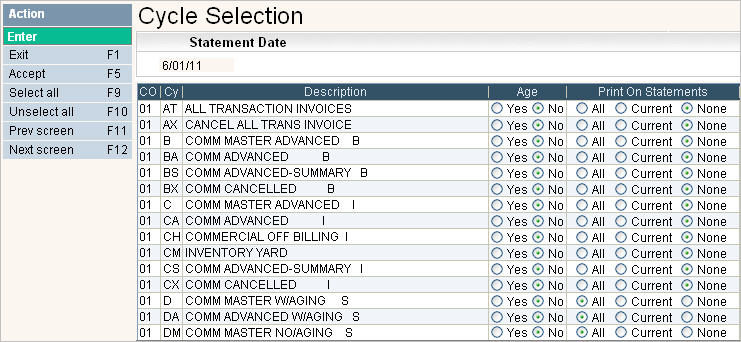
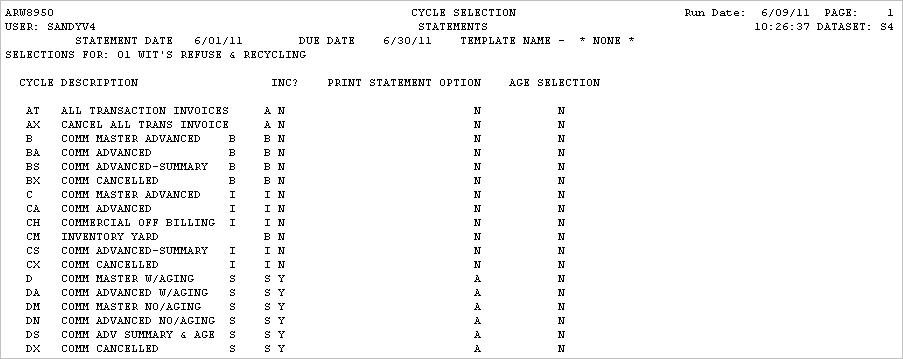
The CO (company), Cy (cycle) and Description (Cycle Description) fields will automatically be filled in. Select if customers in the cycles should be aged by clicking on the Yes option in the Age column, this will put a ![]() in the circle. If a cycle should NOT be aged, you must select No - leaving this column blank is not an option. You can click on
in the circle. If a cycle should NOT be aged, you must select No - leaving this column blank is not an option. You can click on ![]() to put a
to put a ![]() in the ALL column for all cycles and
in the ALL column for all cycles and ![]() YES to age any Balance Forward cycles, or
YES to age any Balance Forward cycles, or ![]() to put a
to put a ![]() in the No and None columns for all cycles. Non Balance Forward customers (Open Item & Summary Invoice) can NOT be aged since aging is based on the Invoice Date, not on an aging bucket; therefore this option must by No for those type of cycles.
in the No and None columns for all cycles. Non Balance Forward customers (Open Item & Summary Invoice) can NOT be aged since aging is based on the Invoice Date, not on an aging bucket; therefore this option must by No for those type of cycles.
By answering Yes to Age, the customer's aging bucket balances will 'move' from one to the next (ie: current will go to 31-60, 31-60 will go to 61-90, 61-90 will go to 90+), regardless of if it has really been that many days - so, this option should be considered CAREFULLY. Especially if you want to send Statements at multiple times during the month.
In addition, you can age a cycle without sending a statement - so customers that are billed in multiple months (quarterly, yearly, etc) can be aged but not receive a statement. On the reverse, you can send a statement for customers that owe a balance, but only age them once a quarter.
You can also send a statement for customers that owe a balance and age them every month.
Print on Statements
This option determines what groups/cycles of customers will get a statement - based on the minimum Statement Balance in the Company Master. If you have a minimum balance set up (such as $2 for example) only customers with a balance greater than $2 will generate a statement if their cycle is selected. Customers with a balance less than the minimum will show on a Statement Exception report.
Do you want to send Statements to every customer in a cycle that owes a balance? Use the All option.
Do you want to send Statements ONLY to customers that have had a current charge? Use the Current option. Example of when to use this option: You bill Residential Service Quarterly and send Statements in January, April, July, and October. However, you want customers that have started service in the off months (such as February) to receive a bill this month instead of waiting until the next quarter to send the Statement. You can select Current and only the customers with Current (New) Charges will generate a bill.
Do you NOT want to send statements to this cycle? Use the None option.
If there are additional screens of cycles click the ![]() button or F12 to go to the next screen. You can use the
button or F12 to go to the next screen. You can use the ![]() button to go back a screen.
button to go back a screen.
When you are finished selecting the cycles, click on the ![]() button or press F5 to continue.
button or press F5 to continue.
The system will print a list of the Company Selections and Cycle Selections. Review them CAREFULLY before answering Yes to the next question window.
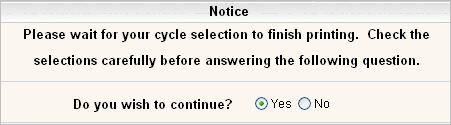

If you want to continue, select Yes and click or press ![]() to continue.
to continue.
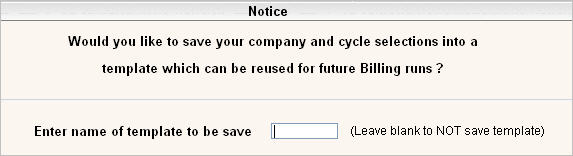
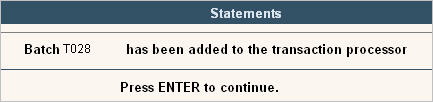
If you want your selections saved in a template, type in a template name in the above screen and press Enter. A message saying your batch has been added to the transaction processor will be displayed.
The following Reports are printed while the Statements are being posted. If running a Test run, make sure to review these reports before running the Actual Statements.
MINBALP - Minimum Balance Exception List - all customers that had balances less than the statement minimum.
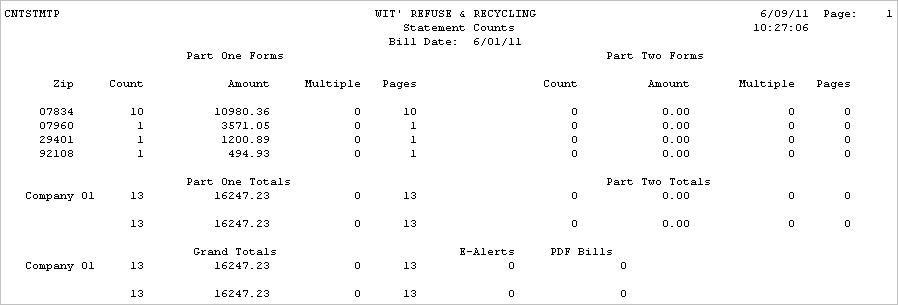
CNTSTMTP - A count of all invoices printed by zip code, along with a count of E-Alerts (email alerts that the bill is ready to be viewed) and PDF bills that were sent.