A template is a previously filled out screen that can be used to select the Companies and Cycles in billing runs without having to manually select them. It is a way to 'store' your selections so you can use them again in the future. Once you complete a billing procedure (Auto Charges, Finance Charges, Open Statement Invoices, Statements or Reminders) the system will ask you if you want to save your choices as a Template. If so, you will name the template. Next time you run the same function, you can simply type in the template name and the selections will be filled out.
This feature is a huge time saver and assists with accuracy. Templates can be set up many months ahead of time if you need different templates for different months, or if your billing needs are simple - you can have one template for each billing function.
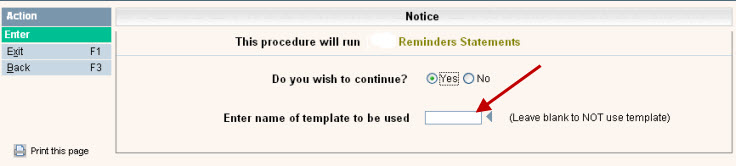
During any of the billing functions (auto charges, finance charges, open statement invoices, statements, reminders, process EFT records and process RCC records), at the beginning of the selection process, the system asks you if you want to use a template.
If you have previously created a Template,enter the template name or click on the ![]() button to display your options.
button to display your options.
Once you have gone through the selection process and have selected your batch to be submitted, the system will ask you if you want to save the selections you just made in to a Template to use in the future.
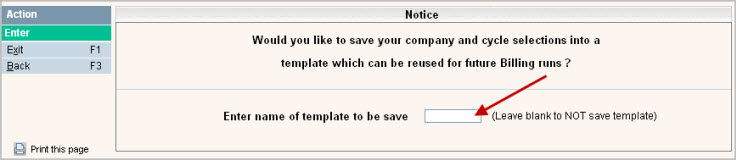
Enter the name in the box and ![]() to accept.
to accept.
Once your template has been saved, you can access it via the Billing Template Entry/Update screen. In addition, you can create templates without going through billing.
From the Billing Processes menu, select the Billing Template Entry/Update option #21, the Template Type scan screen will be displayed.
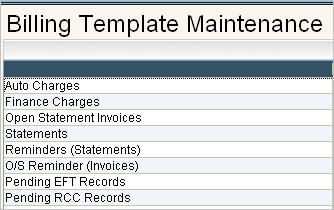
Select the type of Template you want to create or update by double clicking on the line. The Template Scan screen will be displayed. In this example, we have selected the Auto Charges.

If there is an existing template to be updated, double click on that template. To create a new one, click on the ![]() button.
button.
The first screen displayed is the Company Selection screen.
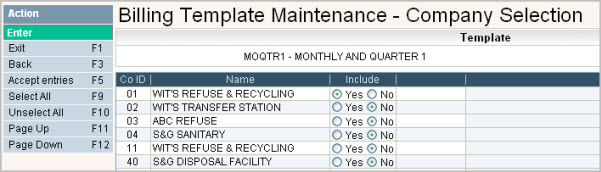
Fill out the screen and click ![]() or press F5 to accept and continue to the cycle selections.
or press F5 to accept and continue to the cycle selections.

Select the cycles to Include for this Template and the Billing Period Message that should be used.
![]() To 'globally' change billing period messages for the next run, you can use the Old and New fields on the top right of the screen. For example if I was getting ready to do October billing (in advance) I would key the following:
To 'globally' change billing period messages for the next run, you can use the Old and New fields on the top right of the screen. For example if I was getting ready to do October billing (in advance) I would key the following:
In the Old box - September Service
In the New box - October Service

Click on the ![]() button. You will then get a confirmation screen:
button. You will then get a confirmation screen:

Click on the ![]() button to confirm the change and all messages that were the Old message will be changed to the New message (like Find & Replace in Microsoft Word). Since you may have different billing periods for different cycles (in advance 1 month, in arrears 1 month, quarterly in advance, etc) you will repeat the 'global change' process for each different message.
button to confirm the change and all messages that were the Old message will be changed to the New message (like Find & Replace in Microsoft Word). Since you may have different billing periods for different cycles (in advance 1 month, in arrears 1 month, quarterly in advance, etc) you will repeat the 'global change' process for each different message.
![]() You can enter *BLANK into the Old box for any Billing Period Messages that are blank and they will get updated with whatever is entered into the New box. Only cycles set to Include=Yes will be updated.
You can enter *BLANK into the Old box for any Billing Period Messages that are blank and they will get updated with whatever is entered into the New box. Only cycles set to Include=Yes will be updated.
Once selections and changes are complete, click on the ![]() button or press F5 to accept and continue to save your template; you will return to the Template Description scan screen.
button or press F5 to accept and continue to save your template; you will return to the Template Description scan screen.