Creating a new customer can be done 2 different ways: from scratch - entering all information in a blank Customer Profile, or copying an existing customer profile in to a new account (this option saves time by keeping certain information when the account is copied; such as billing information). It is especially helpful when setting up new service locations for Roll Off customers, school districts, municipal and HOA contracts, and to create a 'vacant' account when a customer is moving.
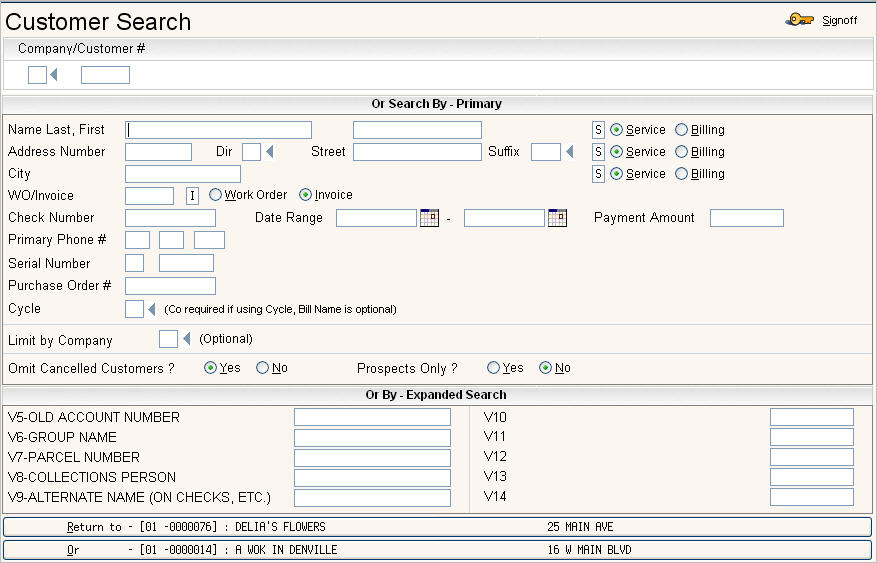
![]() If customers have already been entered in to your system, you may want to search to see if the customer already exists. In addition you may want to check if the address is already entered under a different name, or if the customer has been entered at a different address.
If customers have already been entered in to your system, you may want to search to see if the customer already exists. In addition you may want to check if the address is already entered under a different name, or if the customer has been entered at a different address.
From the i-Pak Master Menu, select the Customer Service option. The customer search screen will be displayed.
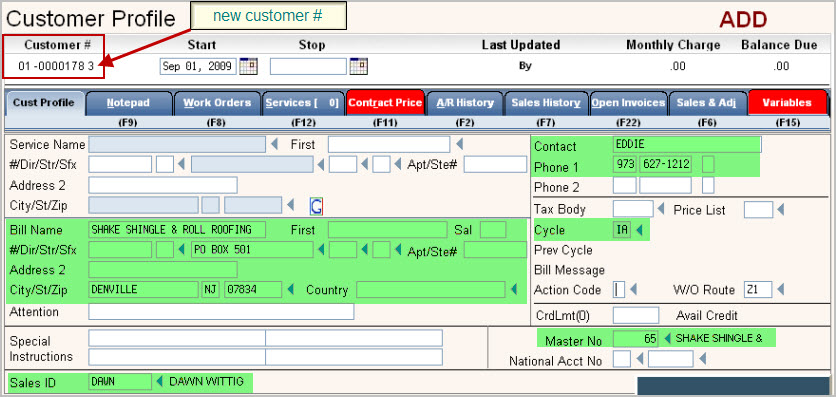
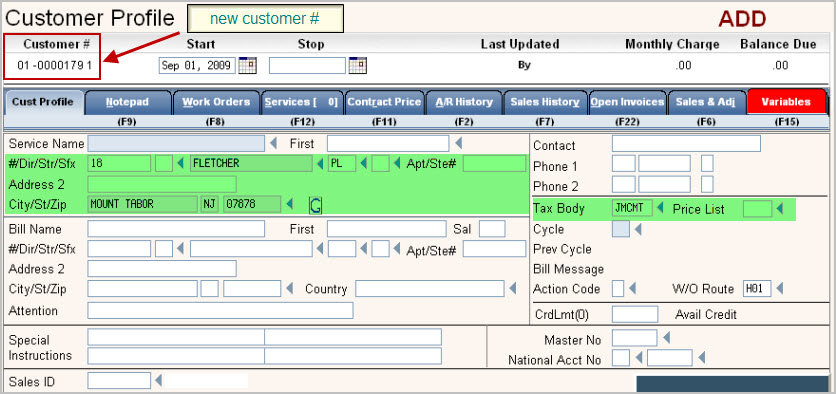
In order to create a new customer, you must assign the account to a specific company. Go to the company field portion of the company/customer #. Fill in the company field with the id for the company you want to put the customer in (this is usually something like 01, 02, 1 , etc). If you are unsure of the company id, you can click on the small blue arrow ![]() to the right of the field to prompt (or press the F4 button on your keyboard) for a list of company id's.
to the right of the field to prompt (or press the F4 button on your keyboard) for a list of company id's.
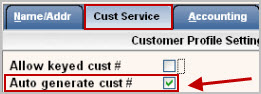
You do NOT need to enter a customer #, the system can automatically assign one as long as the company master is set up to 'auto generate customer number':
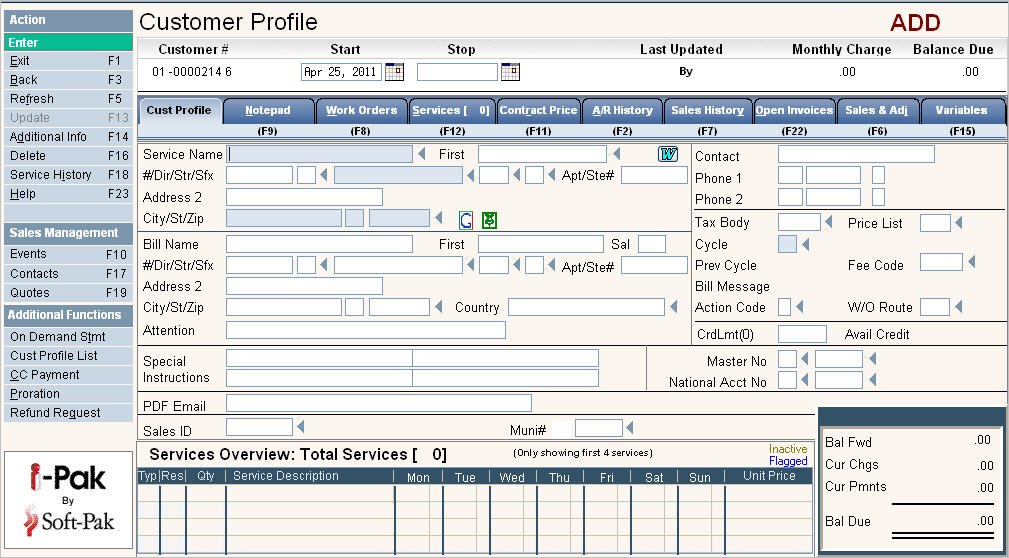
Press the ![]() button on the left side tool bar, or press F10 on your keyboard. This will create a new customer # and put you in a blank Customer Profile screen.
button on the left side tool bar, or press F10 on your keyboard. This will create a new customer # and put you in a blank Customer Profile screen.
These may vary depending on the type of customer and needs of your company.
![]() You can either use your mouse to go from field to field, or simply press the Tab key on your keyboard. Once all the necessary fields are filled in, press Enter to accept your entries. If there are any errors, or missing information, the system will display a Red error field on the bottom of the screen.
You can either use your mouse to go from field to field, or simply press the Tab key on your keyboard. Once all the necessary fields are filled in, press Enter to accept your entries. If there are any errors, or missing information, the system will display a Red error field on the bottom of the screen.
Fill in the Customer Profile screen - click here to display all fields,
Prorations - If the customer is starting service during a billing period (middle of the month or quarter, etc) and you want to charge them (if billing in advance) or credit them (if billing in arrears), you can click the Proration button ![]() and the system will automatically calculate the prorated amount based on # of days OR # of pickups.
and the system will automatically calculate the prorated amount based on # of days OR # of pickups.
Once all the fields have been filled in on the Customer Profile screen, click or press ![]() to accept your entries. If there are any errors, there will be a message on the bottom of the screen in red. If there are not any errors, the system will display the following message:
to accept your entries. If there are any errors, there will be a message on the bottom of the screen in red. If there are not any errors, the system will display the following message:
![]()
You can click any of the Tabs (such as Notepad, Services, etc) to add additional information to the Customer's account. (See the Entry Steps Continued below). This will save the new account and display the tab you selected.
You can click or press ![]() to accept changes - this will save the new account and return you to the Customer Search screen.
to accept changes - this will save the new account and return you to the Customer Search screen.
![]() If you select Back, Main or Refresh - your new Customer will NOT be saved. These are 'undo' keys.
If you select Back, Main or Refresh - your new Customer will NOT be saved. These are 'undo' keys.
If you are entering a residential customer, once you enter after the ![]() message, you will receive the message
message, you will receive the message ![]() and the services entry/update window will be displayed automatically. Enter routing and service information (charge or size/charge codes) for the customer. If using the Address Master and the service address entered is valid in the address master, the routing will be automatically defaulted; you will just need to enter the appropriate services (charge or size/charge codes).
and the services entry/update window will be displayed automatically. Enter routing and service information (charge or size/charge codes) for the customer. If using the Address Master and the service address entered is valid in the address master, the routing will be automatically defaulted; you will just need to enter the appropriate services (charge or size/charge codes).
Additional Info - this screen contains additional flags or settings for the customer such as: Finance charges (yes or no), PO required (to force purchase order number entry when entering work orders), and other fields that are used in 'add on' programs (electronic billing, EFT processing, Scale House management). Some of the fields are set automatically by the Cycle the customer is assigned to, but may be overridden depending on your security. Click here for Additional Info.
For all customers, add services/inventory and monthly charges on the Services Tab.
Services and routing entered are used to generate Route Lists.
Add services that are routed - such as a 4yd Front Load Trash container picked up 2x per week.
Add monthly recurring charges for services (either standard pricing or contract monthly pricing).
Add monthly rental for containers (such as compactors, on call containers, etc).
Add bin/container specific notes to print on Route Lists.
Set up 'scheduled' or 'calendar' roll off boxes with routing to automatically generate work orders.
Add inventory records for roll off box - this gives the ability to print an Inventory Listing of where all the boxes are located.
Add notes for the customer in the Notepad.
If driver notes are needed on the Route List or Work Orders (in addition to Special Instructions).
If there is a Contract, enter the Contract Expiration note with the date of the expiration as the Note Date - provides easy reporting in the future.
Enter other Contract related information such as: no price increase during 1st 2 years, 5% in 3rd year, etc.
Additional information that the might be important when setting up a Customer.
Enter Contract Pricing if there are special charges different than standard pricing.
Used for pricing that is special for the customer and is NOT an Auto (recurring) charge.
For on call customers, enter the 'per pickup' amount
For Roll Off customers, enter the haul fee, disposal rate, etc if different than the default pricing set up in the Charge Code master.
Enter any special pricing specific to the customer -(such as pricing for extra pickups, rebate amounts, etc) and is NOT an Auto (recurring) charge.
Enter Work Orders if needed.
Deliver a container, cart, recycle bins etc.
Notify the driver that it is a New start.
Enter any Variables if being used by your company
Additional information for an account - specific to the needs of your environment.
Additional Search criteria to 'look' up customers (such as a collections rep, or lot/parcel number, old account number, etc).
Bring up the Existing customer to be copied.
Go in to Update mode - click on the ![]() button or press F13 (shift F1).
button or press F13 (shift F1).
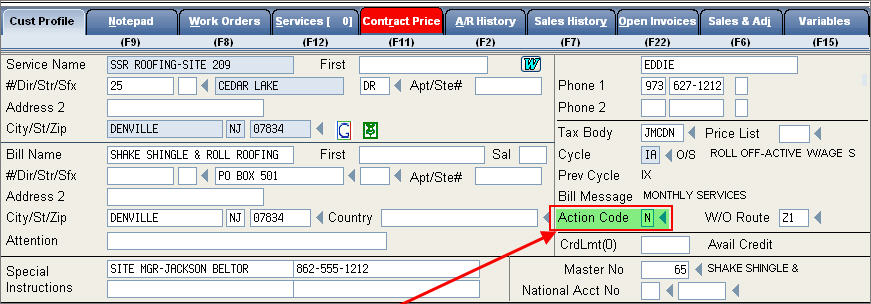
Go to the Action Code field and enter an 'N' to copy an existing customer in to a new account.
Click or press ![]() to accept and there will be a message on the bottom of the screen:
to accept and there will be a message on the bottom of the screen:
![]()
Click or press ![]() and the system will create a new account.
and the system will create a new account.
![]() The 'cust copy fields' in the account class of the cycle determines the fields that will be copied when using an 'N' action code.
The 'cust copy fields' in the account class of the cycle determines the fields that will be copied when using an 'N' action code.
For example, a non residential cycle may have billing and contact information copied over, and a residential cycle may have service address information copied over.
Non Residential
Residential
Continue with the Suggested Entry Steps