From the Master Menu, select Customer Service or click on the ![]() on the top of your screen. The Customer Search screen will be displayed.
on the top of your screen. The Customer Search screen will be displayed.
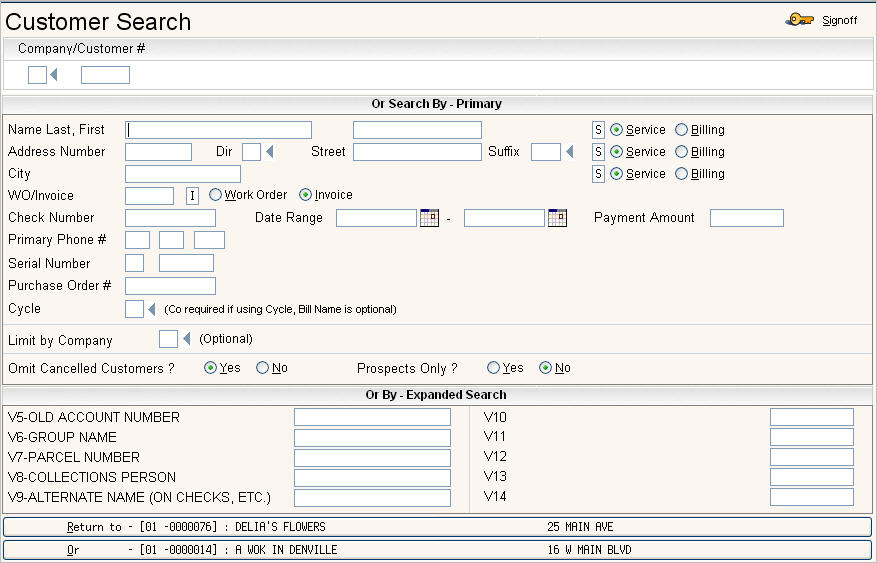
![]() When the Customer Search Screen is displayed, your cursor is positioned on one of the lines. This is called the 'default cursor position'. You can access the other fields by using your mouse or the Tab key on your keyboard. The 'default cursor position' is defined for each User so that each user can have their cursor default in a certain spot. For example, a user in collections might always access a customer using the Customer # - their default would be the Company/Customer # field, a dispatcher might always use the Address fields, so their default would be the Address, a customer service rep may always use the Customer Name so their default would be the Customer Name field. These defaults are set up in the i-Pak User Security file - please see your System Administrator to set these up.
When the Customer Search Screen is displayed, your cursor is positioned on one of the lines. This is called the 'default cursor position'. You can access the other fields by using your mouse or the Tab key on your keyboard. The 'default cursor position' is defined for each User so that each user can have their cursor default in a certain spot. For example, a user in collections might always access a customer using the Customer # - their default would be the Company/Customer # field, a dispatcher might always use the Address fields, so their default would be the Address, a customer service rep may always use the Customer Name so their default would be the Customer Name field. These defaults are set up in the i-Pak User Security file - please see your System Administrator to set these up.
There are several fields to assist you in finding the customer you are looking for.
![]() Sometimes less is more when searching for a customer. Instead of typing in the whole name, you can use part of the name, address, etc and the system will begin the scan there.
Sometimes less is more when searching for a customer. Instead of typing in the whole name, you can use part of the name, address, etc and the system will begin the scan there.
Company/Customer #: ![]() If you know the customer number, enter the company id and the customer number (you do NOT need to type in the leading 0's).
If you know the customer number, enter the company id and the customer number (you do NOT need to type in the leading 0's).
Name and Address Fields:

The system provides the flexibility to search either by service information or billing information and you can select either by clicking the ![]() in front of the option. Your user default will display one or the other, but they can be changed as needed.
in front of the option. Your user default will display one or the other, but they can be changed as needed.
Name Last, First: Enter either the service name or billing name in the first field if non residential, or the last name for residential. Click on either Service or Billing to indicate what type of name to search by. For example, someone in operations might search for the service name 'Wal-Mart', but a collections person may want to search by the billing name of 'Oakleaf Waste Management'.
Address Number, Dir, Street, Suffix:
Enter either the service or billing address components you want to search by. You can enter a full address using all 4 fields, just a couple of fields, or just one field. If you want to search for all addresses on a particular street - just use the Street field.
City
Enter either the service or billing city you want to search by. This field can be used in conjunction with the address fields to search for customers.

WO/Invoice: If you want to look up a customer by a work order or invoice number, enter the number in the box and type W for Work order or I for invoice number. When you access the customers work order screen, that work order # will be displayed at the top of the list.
Check Number: If you want to find a customer based on a particular check number that was posted to their account, use the Check number field. If you also know the approximate posted date of the check - enter a Date Range in your search. Last, you can enter a Payment Amount to narrow the results even further.
Primary Phone #: If you want to look up a customer by their primary phone number, enter the phone number here. If you use area codes on the Customer Profile, then you will need to enter the area code here as well.
Serial Number: If you use serial numbers on your containers or carts, you can enter the 2 character company id and the serial number to find the customer it belongs to. This is especially helpful after a storm when carts might have been blown all over the neighborhood. You are not required to enter a company id into the serial number search. If more than one account exists with the serial# you entered, then you will be brought into a scan to select the account. This scan will display serial numbers that are currently on your services screen in customer accounts (whether or not they are built in container inventory) as well as serial numbers that are in the yard accounts.
Purchase Order #: If you want to search for a customer based on the PO# that was entered into their work order, enter that PO# here. This search is based on the PO# entered in the work order and not the notepad. When you access the customers work order screen, only work orders with that PO# will be displayed.
Cycle: If you want to limit the search to customers that are only in a certain cycle, then enter that cycle here. You will also be required to enter a Co#. These 2 fields can be used in conjunction with the Billing Name if needed.
![]()
Limit by Company: Used in conjunction with one of the above search options to limit the search to just one company. If you have multiple companies and want to look up a customer in a particular company, this field is very helpful.
![]()
Omit Cancelled Cust's: If you only want to look at active accounts, select yes by clicking on the ![]() . If you want to look through all active and inactive customers, select No. This field is also a default setting in the i-Pak User Security file - see your System Administrator to set change this default.
. If you want to look through all active and inactive customers, select No. This field is also a default setting in the i-Pak User Security file - see your System Administrator to set change this default.
Prospects Only?: If you only want to look at prospect accounts (customers set up in a prospect cycle), select yes by clicking on the ![]() .
.
Once you have type in your search criteria, click or press ![]() . If the system finds a unique match, it will display the Customer Profile screen. If the system does not find a unique match, or if there are multiple matches, the Customer Scan screen will be displayed
. If the system finds a unique match, it will display the Customer Profile screen. If the system does not find a unique match, or if there are multiple matches, the Customer Scan screen will be displayed

These fields are also known as Expanded Variables. In order for them to appear on this tab, they have to be 'turned on' and defined in the Systems Control Master in the Company Master file. They are set up based on the needs of your environment. Once the fields are turned on, there are corresponding fields in the Expanded Variables field in the Customer's account. Information should be entered there as well in order to search by it.
All, some, one or none of these fields may be displayed - it depends on your Company set up. In the box, key in the search criteria appropriate for that field and click or press ![]() . If the system finds a unique match, it will display the Customer Profile screen. If the system does not find a unique match, or if there are multiple matches, the Customer Scan screen will be displayed.
. If the system finds a unique match, it will display the Customer Profile screen. If the system does not find a unique match, or if there are multiple matches, the Customer Scan screen will be displayed.
![]() The bottom 2 fields are not displayed when you first access Customer Search; however once you access a Customer's account, it is saved in the 'Return to section. When you access a second customer, the first one goes to the 'Or' field (next to last customer) and the second customer goes to the 'Return to' section (last customer). This feature is very helpful in remembering the account 'you were just in'.
The bottom 2 fields are not displayed when you first access Customer Search; however once you access a Customer's account, it is saved in the 'Return to section. When you access a second customer, the first one goes to the 'Or' field (next to last customer) and the second customer goes to the 'Return to' section (last customer). This feature is very helpful in remembering the account 'you were just in'.


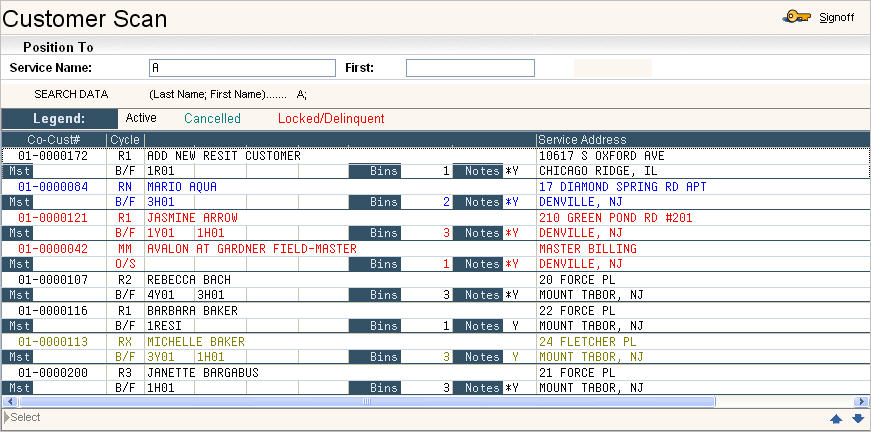
In the Position To section: The system will display the field and the criteria used for the search. You can refine your search by changing these fields and pressing
 ![]() . The original search is retained in the SEARCH DATA section for reference.
. The original search is retained in the SEARCH DATA section for reference.
Legend: customers in black are customers in an active cycle, customers displayed in yellow are cancelled (in a cancelled cycle) and customers in red are delinquent or locked (action code of D or L), you can also have customers display in blue, with a user defined action code (contact Support Services to set this up).
Select the customer you want by double clicking on the line. You can also use the up and down arrows on your keyboard to move the dotted line box up and down through the screen. When you are on the line for the customer you want, press the space bar - this will highlight the line, press ![]() and the Customer Profile screen will displayed.
and the Customer Profile screen will displayed.
There is also additional information provided on the Scan screen - click the ![]() button or F19 (shift F7). The screen will display 2 lines of information for each customer.
button or F19 (shift F7). The screen will display 2 lines of information for each customer.