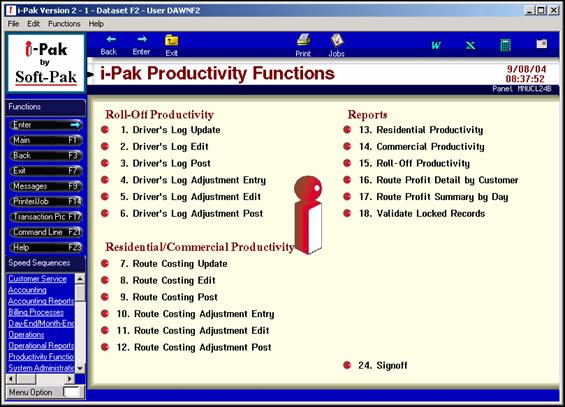
As the Cover Sheet, Work Orders and disposal tickets come back from the drivers, the information needs to be entered in to each Driver’s Log. Go to the Productivity Menu – from the i-Pak Master Menu, selection ‘Productivity Functions (option #8).
Select Driver’s Log Update (option #1) to access the Driver Log Scan screen.
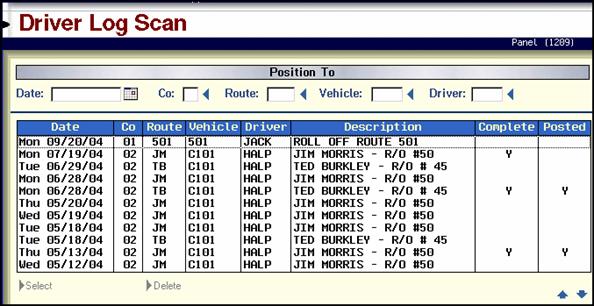
The logs are listed by date (newest on top), then by company, then by route, vehicle and driver.
|
Date |
The date of Driver Log – corresponds to the action date of the work orders.
|
|
Co |
Company / Master Company id the log was created under. If file sharing for Residential/Commercial route costing is set up (in the Company Master) this will be the Master Company id.
|
|
Route |
Route ID/Code for all work orders in the Driver log.
|
|
Vehicle |
Vehicle ID/Code for all work orders in the Driver log.
|
|
Driver |
Driver ID/Code for all work orders in the Driver log.
|
|
Description |
The Description of the Route Code.
|
|
Completed |
If the Driver Log has been completed, there will be a ‘Y’ in this column.
Note: “Complete” indicates all cost information has been keyed and driver log was marked as ‘completed’. Also, marking a route as complete automatically toggles the work orders on that route and day as complete and ready for posting. If corrections need to be made on any work order, it may be individually ‘toggled’ from the status of “POST/INV PENDING” back to status of “WO PRINTED” using the Work Order Toggling (Individual) option # 11 off the Accounting Menu.
|
|
Posted |
If the Driver Log has been posted, there will be a ‘Y’ in this column.
“Posted” work orders were posted (via the Post WO’s/Create Invoices option #11 on the Accounting Menu) and Driver’s Log was posted by using Selection #2 on the ‘Productivity Functions Menu’. |
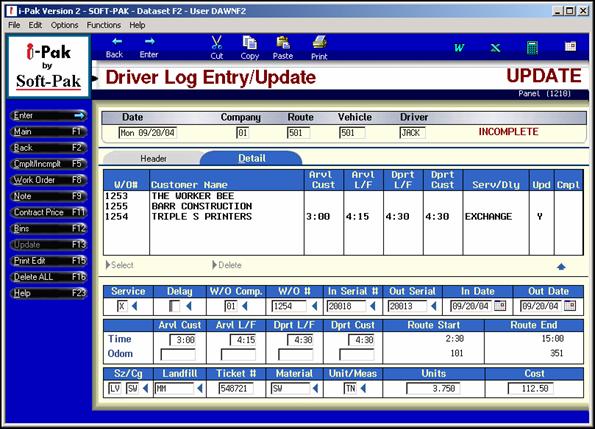
Select the appropriate driver’s log to be updated by double clicking on the line, or highlight the line and click on ‘Select’ at the bottom. This will display the Driver Log Entry/Update screen.
![]() A File is recorded when a user is in a Driver Log and therefore “locks” that file from being updated by another user. If the user is updating the Bins via Driver Logs, the Customers account will be locked from any other user updating it at the same time. If the user is completing a log, the work orders will be locked until that process has finished. If any of those areas are already being updated by another user, the user updating through driver logs will get a message showing that another user is updating.
A File is recorded when a user is in a Driver Log and therefore “locks” that file from being updated by another user. If the user is updating the Bins via Driver Logs, the Customers account will be locked from any other user updating it at the same time. If the user is completing a log, the work orders will be locked until that process has finished. If any of those areas are already being updated by another user, the user updating through driver logs will get a message showing that another user is updating.
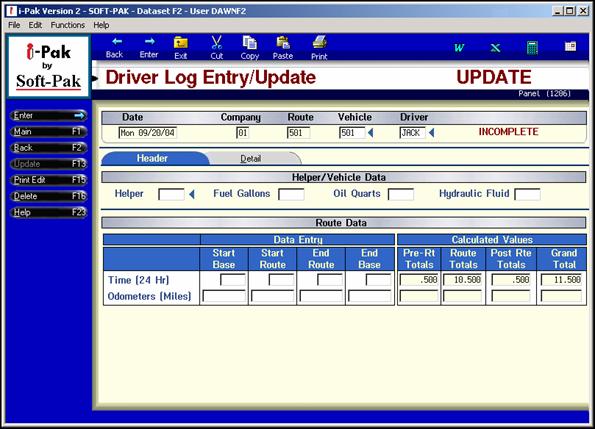
The Driver Log “Header” is used to capture information specific to the entire Route for the indicated combination Date, Company, Route, Vehicle and Driver. This includes Fuel Gallons, Oil, Hydraulic Fluid and Start/End Base and Route times as well as Odometer readings.
The logs are listed by date (newest on top), then by company, then by route, vehicle and driver
|
Date |
The date of the Driver’s Log which corresponds to the Action Date for all work order in the log.
|
|
Co |
Company / Master Company id the log was created under. If file sharing for Residential/Commercial route costing is set up (in the Company Master) this will be the Master Company id.
|
|
Route |
Route ID/Code for all work orders in the Driver log.
|
|
Vehicle |
Vehicle ID/Code for all work orders in the Driver log.
|
|
Driver |
Driver ID/Code for all work orders in the Driver log.
|
|
Helper |
Helper ID/Code (from the Driver Master) for all work orders in the Driver log.
|
|
Fuel Gallons |
Gallons of Fuel added during re-fuel stops for the route. This is a 1 decimal position field-enter 21 gallons as 21.0.
|
|
Oil Quarts |
The number of quarts of motor oil added during pre or post trip. This field is a 2 decimal field. This number is INFORMATION ONLY.
|
|
Hydraulic Fluid |
The number of quarts of hydraulic fluid added during pre or post trip. This field is a 2 decimal field. This number is INFORMATION ONLY.
|
|
Route Data |
|
|
Time – Start Base |
The time the driver ‘punches in’ for the day. MUST be entered in military (24 hour) time.
|
|
Time – Start Route |
The time the driver started the route. This can be up to your company’s discretion – either the time the driver leaves the yard, or the time the driver arrives at the first customer. The important thing is to be CONSISTENT. Time MUST be entered in military (24 hour) time.
|
|
Time – End Route |
The time the driver ended the route. This can be up to your company’s discretion – either the time the driver pulls in to the yard, or the time the driver completed the last customer. The important thing is to be CONSISTENT. Time MUST be entered in military (24 hour) time.
|
|
Time – End Base |
The time the driver ‘punches out’ for the day. MUST be entered in military (24 hour) time.
|
|
Odom – Start Base |
The odometer reading on the vehicle before starting the day’s activities. This reading is usually noted during a pre-trip inspection. This field is not required.
|
|
Odom – Start Route |
The odometer reading on the vehicle at the time the route is started (should be noted the same time as ‘Start Route time’).
|
|
Odom – End Route |
The odometer reading on the vehicle at the time the route is ended (should be noted the same time as ‘End Route time’).
|
|
Odom – End Base |
The odometer reading on the vehicle at the time the vehicle is ‘parked’ for the day. This reading is usually noted during a post-trip inspection. This field is not required. |
Once all of the required information has been entered, press or select ENTER. The system will verify all entries and calculate the Total Hours and Total Miles. Press or select ENTER a second time to continue with the data entry of the Driver Log Detail.
|
Calculated Totals |
|
|
Time – Pre Rt Totals |
Total hours between Time–Start Base and Time-Start Route
|
|
Time – Route Totals |
Total hours between Time-Start Route and Time-End Route
|
|
Time – Post Rte Totals |
Total hours between Time-End Route and Time-End Base
|
|
Time – Grand Totals |
Total calculated ALL times
|
|
Odometer – Pre Rt Totals |
Total mileage between Odom-Start Base and Odom-Start Route
|
|
Odometer – Route Totals |
Total mileage between Odom-Start Route and Odom-End Route
|
|
Odometer – Post Rte Totals |
Total mileage between Odom-End Route and Odom-End Base
|
|
Odometer – Grand Totals |
Total calculated ALL mileage |
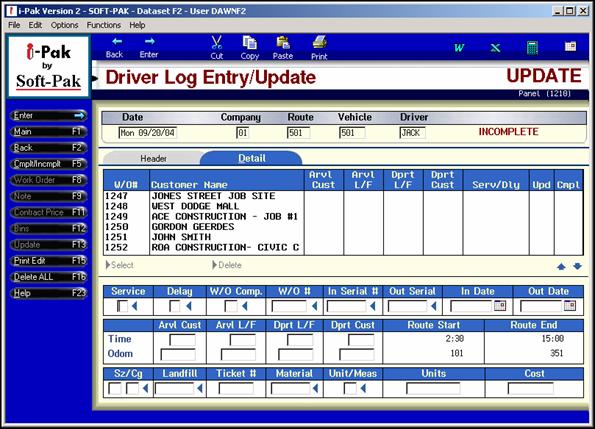
The Driver Log Entry / Update Detail tab will display any Work Orders that have been Dispatch Toggled with the same ‘Header Key” (date/route/vehicle/driver). The screen will be displayed in W/O# order, with the Customer Name indicated to the right. Once data had been keyed, then the order will be re-sorted by time.
For ease of entry, it is best to key in the data in the order that the driver serviced the customer (should be the same order on their Driver Cover Sheet).
To begin, from the work orders listed on the top of the screen, double click on the line of the first work order the driver serviced. The detail line will be displayed below in the ‘input’ section of the screen.
![]() Once a WO has been chosen, you are able to access the actual Work Order, Customer Notes, Contract Pricing and Bins by selecting the applicable option on the left toolbar. You also have access on the left toolbar to Delete, Print an individual Edit List or Complete/Incomplete the Driver Log.
Once a WO has been chosen, you are able to access the actual Work Order, Customer Notes, Contract Pricing and Bins by selecting the applicable option on the left toolbar. You also have access on the left toolbar to Delete, Print an individual Edit List or Complete/Incomplete the Driver Log.
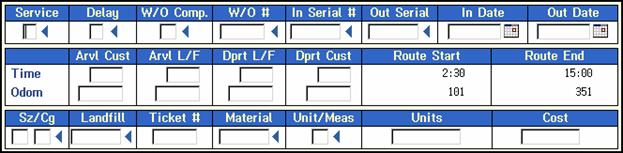
|
Service |
Indicate the Type of Service (delivery, exchange, term, remove, etc) being performed. Press F4 to access a look up screen for choices or click on the blue arrow
|
|
Delay |
Indicate the Type of Delay if applicable. Press F4 to access a look up screen for choices or click on the blue arrow
|
|
W/O Comp |
The company ID associated with the work order. This may be different than the company id indicated on the Driver Log Header screen as that could be the Master company id if Driver Log sharing is set up in the Company Master.
|
|
In Serial# |
The serial number of the ‘In’ box (deliveries and exchanges for example). This field can be used to automatically update the customer’s services (bin) screen when posting the Driver’s Log.
|
|
Out Serial # |
The serial number of the ‘Out’ box (removals and exchanges for example). This field can be used to automatically update the customer’s services (bin) screen when posting the Driver’s Log.
|
|
In Date |
Date the serial # (container) was placed ‘In’ Service
|
|
Out Date |
Date the serial # (container) was taken ‘Out’ of service.
|
|
Times There are four fields available to enter the times associated with the driver’s activity for the work order. Time MUST be entered in military (24 hour) time. Landfill arrival and departure times are ONLY necessary if the driver went to a disposal facility for that work order.
|
|
|
Time – Arvl Cust |
Arrival time at Customer. If this is the FIRST work order arrival time, it MUST match the Route Start time from the ‘header’ screen. The time is also displayed to the right.
|
|
Time – Arvl L/F |
Arrival time at the Landfill/Disposal facility.
|
|
Time – Dprt L/F |
Departure time from the Landfill/Disposal facility.
|
|
Time – Deprt Cust |
Departure time from the Customer (the time the customer’s work order was completed). This may be the same time as the Dprt L/F time for certain types of service (exchanges for example). If this is the LAST work order departure time, it MUST match the Route End time from the ‘header’ screen. The time is also displayed to the right.
|
|
Note: If the first arrival customer time and the route start time, or the last departure customer time and the route end time do not match – the following message will be displayed:
|
|
|
Odometer There are four fields available to enter the mileage associated with the driver’s activity for the work order. Entering Odometer readings are NOT required fields; however, if you entered an Odometer Start and End date on the ‘header’ screen, then they will be required on the Detail screen. |
|
|
Odom – Arvl Cust |
Arrival odometer reading at Customer.
|
|
Odom – Arvl L/F |
Arrival odometer reading at Landfill/Disposal facility (if applicable).
|
|
Odom – Dprt L/F |
Departure odometer reading at Landfill/Disposal facility (if applicable)
|
|
Odom – Dprt Cust |
Departure odometer reading at Customer.
|
|
Route Start |
Display Only – The route start time and odometer reading entered on the ‘header’ screen.
|
|
Route End |
Display Only – The route end time and odometer reading entered on the ‘header’ screen.
|
|
Disposal Information For Work Orders that have associated disposal tickets, the next section of information is used to capture that information. This is necessary to bill the customer as well as track disposal information for reporting and reconciliation of disposal bills. This information will be added to the work order when the Driver’s log is posted.
Note: If using the Scale-House module, this information can be ‘passed thru’ from the scale transactions (this is set up in the Company Master, on the Scale tab).
|
|
|
Sz/Cg |
The appropriate size and charge code for the disposal information. Press F4 or click on the blue arrow
|
|
Landfill |
The disposal facility code where the load was dumped. For a look up list, press F4 or click on the blue arrow
|
|
Ticket# |
The disposal ticket # from the disposal facility. This is a 7 character field, so if the actual number is longer, be sure to consistently enter the last 7 characters.
|
|
Material |
The appropriate material code for the load. For a look up list, press F4 or click on the blue arrow
|
|
|
|
|
Unit/Meas |
The disposal unit of measure will automatically be defaulted based on the U/M for the Material in the Material Master.
|
|
Units |
The total quantity of the material being disposed.
|
|
Cost |
The total disposal cost to YOUR company (not to the customer). If the Landfill Master is set up with pricing, this field will be calculated automatically, and a message will appear:
If no cost is entered, a warning message will be displayed:
|
Once the information has been keyed, press Enter or click on the Enter button on the left tool bar. Bring up each work order line item and update with appropriate information. Once finished with the route, print an Edit list to review before ‘completing’ the Driver log. Press F15 (hold down the shift key and press F3) or click on the Print Edit button on the left tool bar. Review the Edit list (or Route Supervisor, manager, etc) BEFORE completing the log. You can also print a group of edit lists by using the menu option (see below).
Once the edit has been reviewed, complete the route by pressing F5 or clicking on the Cmplt/Incmplt button on the left tool bar. A message will be displayed on the bottom of the screen: ![]() . Press F5 again or click the Cmplt/Incmplt button on the left tool bar. This will complete the driver log and toggle the work orders in the log.
. Press F5 again or click the Cmplt/Incmplt button on the left tool bar. This will complete the driver log and toggle the work orders in the log.
Once the logs have been marked as Complete, they can be edited again and then posted.
1. You can enter the same Work Order # into the SAME driver log multiple times. This will allow you to enter multiple materials per load (each entry will create a separate line in the work order) and allow loads to have non-consecutive times (i.e., deliver empty container for exchange, but before pulling the full container, you bring the customers full compactor to the landfill. When that second load is done, you complete the removal portion of your initial exchange load.)
2. The same Work Order is NOT permitted in different Driver Logs.
3. You can overlap times on multiple lines if the following is true:
a. The records must have the same customer and landfill times.
b. The records must have the same customer and landfill odometer entries.
c. The records must have the same Service/Delay code.
d. The Service/Delay code used must be set up to “Allow Split Times”.
If you attempt to overlap times and any of the above conditions are not met, you will get a message and the program will not allow you to accept the data. If you go into an existing record and change data with overlapped time, you will get a warning message, but will be allowed to proceed. This is so that you can fix any mistakes that were previously made.
You will NOT be allowed to mark the Driver Logs complete or post it until all the above conditions are met. When posting with split times, the total times and odometers will be calculated and split evenly by the number of records that share the same information.
4. Custom Size/Charge codes CAN be used in the Driver Log
5. If the driver’s hours exceed 15 hours, the user will get a warning message but will be allowed to continue.
6. Negative Costing can be entered (for example, use with recycling rebates, etc).
An example of a Driver Log detail record entered is displayed below:
If you mark a Drivers Log ‘Complete’ and it’s not yet posted, you have the option to mark it ‘Incomplete’ (see same instructions for marking ‘complete’) to fix any mistakes or make any necessary changes. Marking the Drivers’ Log ‘Incomplete’ will toggle the Work Orders back to a ‘Printed status and remove any charges entered into the WO from the Drivers Logs. If the WO has been invoiced, you will be allowed to ‘Incomplete’ the Driver Log, but the invoiced WO will NOT be changed and that line in the Driver Log will remain at ‘Complete’ status.
If the WO has already been toggled, the user will get a warning message when updating the charge code information and when completing the Driver Log. There will also be an error listing on both the Edit and Post reports showing “W/O was toggled prior to completion, no update will occur.”