One of the most import steps in getting Route Costing started is to meet with your staff (drivers, route supervisors, dispatchers, and data entry clerks). Explain the new procedures, the paperwork that needs to be filled out, and the importance of accurate information. Cover Sheets will need to be filled out by the drivers, as this will be the information keyed in to the system. Below is an example of a Route Cover Sheet. It is designed in the same layout as the Route Costing entry screen, and should make data entry quick and easy. These can be printed automatically by the system when Route Lists are run.
Several files need to be updated prior to entering the first Route Costing log. Other Planning and Training (both office and driver related) are necessary to ensure that this process will be successful.
Security
User Security File
Master Files
Company Master
Tax Body Master
Charge Code Master
Route Pickup Frequency Master
Route Code Master
Vehicle Master
Driver Master
Landfill Master
Unit of Measure Master
Material Master
Service/Delay Code Master
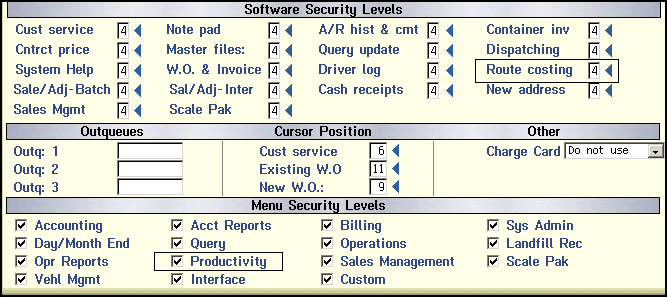
1. User Security: allow access to the Productivity Menu and appropriate level access to Route Costing (i.e. inquiry, update, delete, etc.). For additional information on User Security click here.
2. Company Master: set up the Systems Control Master (Installation tab) to Ö for Route Costing Installed.
3. Company Master: set up the Systems Control Master (Options tab) to Ö for Allow ‘Build route costing file’ default on route list screen.
4. Company Master: If there are multiple companies in your data set (i.e. company 01, 02, etc) and routes cross company lines, set up each Company Record (File Sharing tab) to ‘share’ route codes with the appropriate company.
For example Company 01 and Company 02 share routes. The File Sharing tab would look like this:
Company 01
Residential/commercial route costing ______
Company 02
Residential/commercial route costing 01
5. Tax Body Master: For increased reporting accuracy, we have added a new feature called reciprocal density. The Density Factor is used when a route may be split between rural and city areas – and the route for that day in one Tax Body is denser than the same route in another Tax Body.

For example; Route C1 picks up trash in tax bodies ‘CITY’ and ‘RURAL’. There are 25 stops in the CITY and 10 in RURAL. The ‘CITY’ stops could easily be right next door to each other, whereas the RURAL stops may be miles apart. The Operations Manager has determined that the CITY is 5 times denser than the RURAL tax body. The density factor for CITY=1 and for RURAL=5.
When the route lists is generated, a file called RALL (Route Allocation) is created with a record for each Date /Route/Company/Tax Body that contains the calculated # of stops and capacity. This information is then used with the Density Factor, during the Route Costing Post to determine allocated mileage and hours. Currently the RALL file information is available through ‘Query’ only.
RALL file:
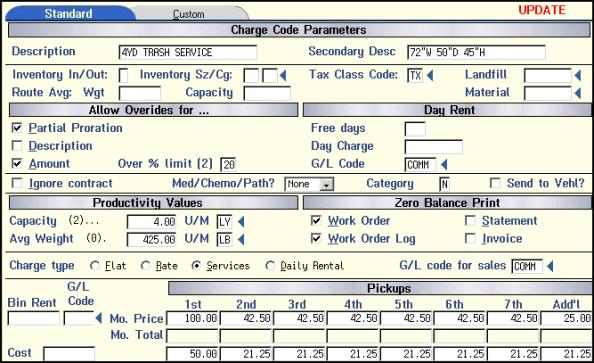
6. Charge Code Master:
Fill in the Capacity of the Container – in our example, it is a 4yd container, so the capacity is 4 LY (loose yards)
If Using Route Allocation (RALL) fill in the Route Average Weight and Capacity.
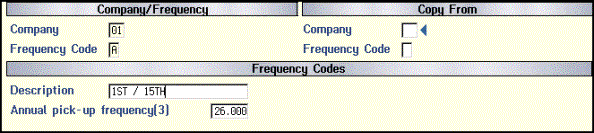
7. Route Pickup Frequency Master: For stops that are picked up less than weekly, a frequency code can be created. The frequency will be used in the calculations of revenue for the route. Fill in the annual frequency for the particular code.
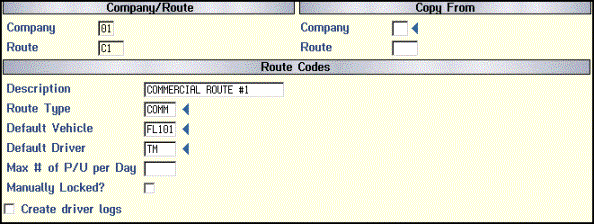
8. Route Code Master: Set up each route for the company. Each route can be assigned to a default vehicle and default driver to save keying time and accuracy (both in data entry and in the Scale-Pak module).
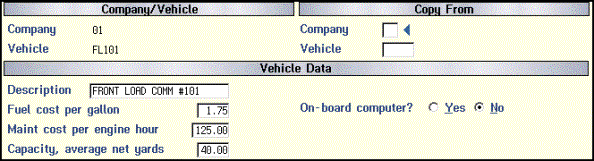
9. Vehicle Master: Set up each vehicle in the fleet with the fuel cost per gallon, the maintenance cost per engine hour, and the capacity (avg net yards) for the vehicle. This information will be used with the hours, miles, and gallons entered in the costing log to calculate the ‘costs’ portion of the Route Costing log.
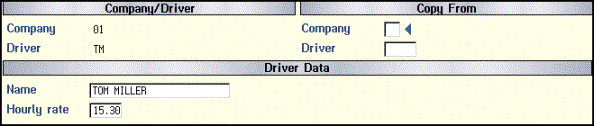
10. Driver Master: Set up each driver (including route supervisors, etc.) and helpers with their labor rate per hour. This should be a ‘padded’ rate including salary, benefits, etc. This information will be used with the hours entered in the costing log to calculate the ‘costs’ portion of the Route Costing Log.
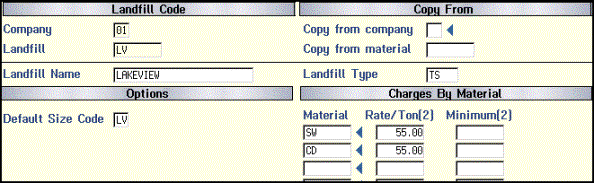
11. Landfill Master: Set up each disposal site that the company uses. Each disposal site can be set up with the materials brought to that facility and the rate per unit for that material. When entering in the disposal information in the Route Costing Log, i-Pak will calculate the ‘cost’ based on the material, landfill (and the amounts set up in the landfill master) and the actual units (tons, yards, etc).
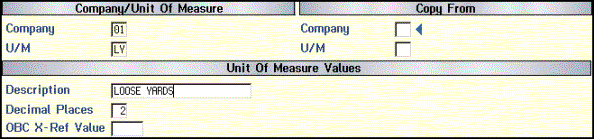
12. Unit of Measure Master: Set up each unit of measure that will be used with the appropriate decimal positions. (For example: tons=TN, loose yards=LY, compacted yards=CY, etc.).
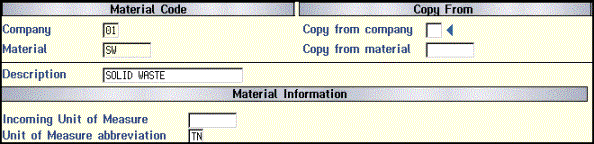
13. Materials Master: Set up each material with the unit of measure abbreviation (TN, LY, etc). All other fields in this file are used in the Scale-Pak module.
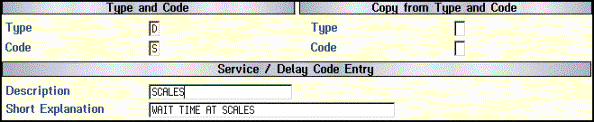
14. Service and Delay Master: Set up possible ‘Delay’ codes to explain possible lapses in time. (Service codes are used in Drivers Logs, Delay codes can be used in both). Only a code and description need to be entered for the Delay codes. All other fields are used in Service codes.