There are several procedures available to review Route Costing logs prior to being posted. However, if there are corrections that need to be made AFTER posting, there are new options that enable you to make adjustments, then edit and post them to the Route Costing file.
From the Productivity Functions menu, select Route Costing Adjustment Entry (option #10), the Route Costing Adjustments Log Selection screen will be displayed. Only posted Route Costing Logs can be selected for adjustments.

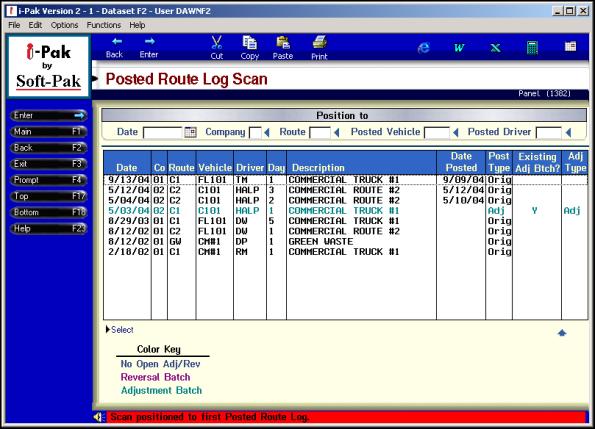
Press F8 or click on the Posted Logs Sc button on the left hand tool bar to display posted Route Costing logs.
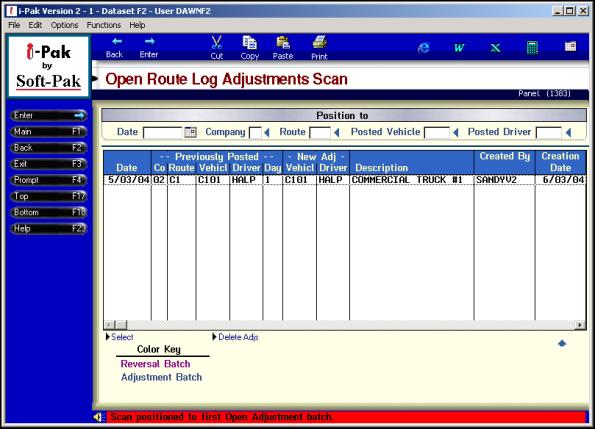
Press F9 or click the Open Adjs Scan button on the left hand tool bar to display any Open Adjustment batches.
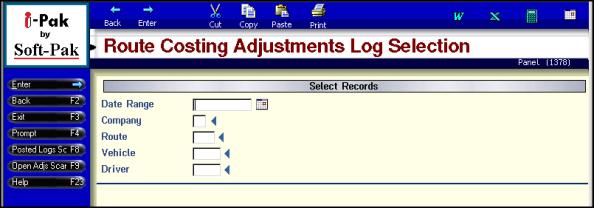
Enter the Date, Company, Route, Vehicle and Driver for the log to be adjusted. Press Enter or click on the Enter button on the left hand tool bar. The Route Log Adjustments screen will be displayed in Inquiry mode.
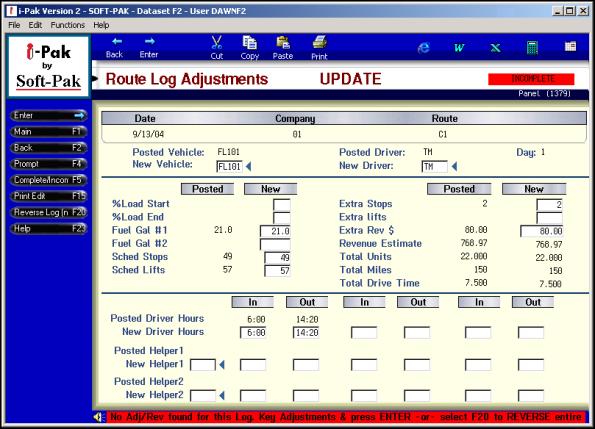
To make adjustments, click on the Update button on the left hand tool bar, or press F13 (hold the shift button and press F1), this will put the screen in ‘Update’ mode. Adjust the appropriate fields by entering the correct information in the boxes under the NEW column – next to the original posted information.
To reverse the entire log, press F20 (hold shift and press F8) or click on the Reverse Log button on the left hand tool bar. Reversing the entire log and posting the adjustment will be like the original log never posted.
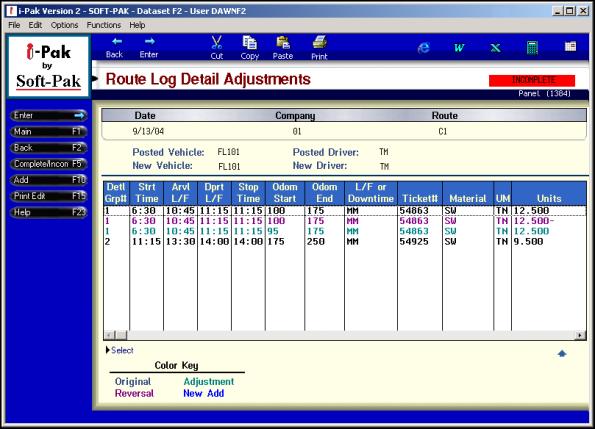
Once the corrected information is keyed in, press Enter or click on the Enter button on the left hand tool bar. A message on the bottom of the screen will indicate ‘Data has been changed…press ENTER to continue’. Press Enter or click on the Enter button on the left hand tool bar. The Route Log Detail Adjustments screen will be displayed for any detail line adjustments that need to be made.
Note: the original date, company, route, POSTED Vehicle Id, or POSTED Driver Id. However, a NEW Vehicle Id and/or NEW Driver Id can be entered for the Route Costing log. During posting, a reversal will post for the original Vehicle Id/Driver Id and the adjustment will post for the NEW Vehicle Id/Driver Id.

There is a Color Key legend on the bottom of the screen to indicate which line items are the originals (black), adjustment lines (teal), reversal lines (purple) and new lines added (blue). To make a change, double click on an original line or highlight the line and click on Select on the bottom of the screen. The Create Reversal/Adjustment screen will be displayed.
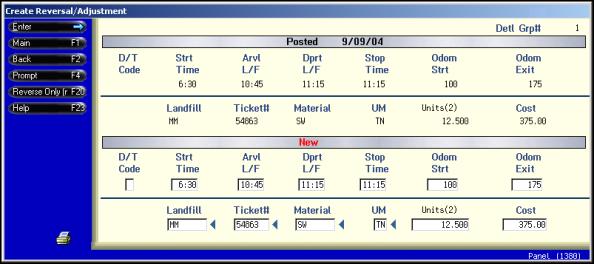
Correct the appropriate field by keying in the new information. To reverse the line press F20 (hold down shift and press F8) or click on the Reverse Only button on the left hand tool bar. To accept changes, press Enter or click on the Enter button on the left hand tool bar. A reversal line and an adjustment line will be created.
In the example above, we changed the odometer start from 100 to 95. A reversal line (in purple) was created reversing the original line, and an adjustment line (in teal) was created with the new information.
Once all adjustments are made, complete the adjustment log by pressing F5 or clicking on Complete/Incom button on the left hand tool bar. If needed, a edit list can also be printed from this screen by pressing F15 (hold down shit and press F3) or click on the Print Edit button on the left hand tool bar.
Press F2 or click on the Back button on the left hand corner tool bar to go back to the Route Log adjustment header screen. Or go to the Route Costing Log Adjustment screen by pressing F1 for main or clicking on the Main button on the left hand tool bar. To exit adjustments and Edit/Post the adjustments, press F3 to exit or click on the Exit button on the left hand tool bar. The Productivity Functions menu will be displayed.