The Mass Cancelled Customer Credit Balance Refund Checks Processing feature is an automated process that will adjust a customers account and update a file for an accounts payable system to generate refunds.
The process will:
Setup
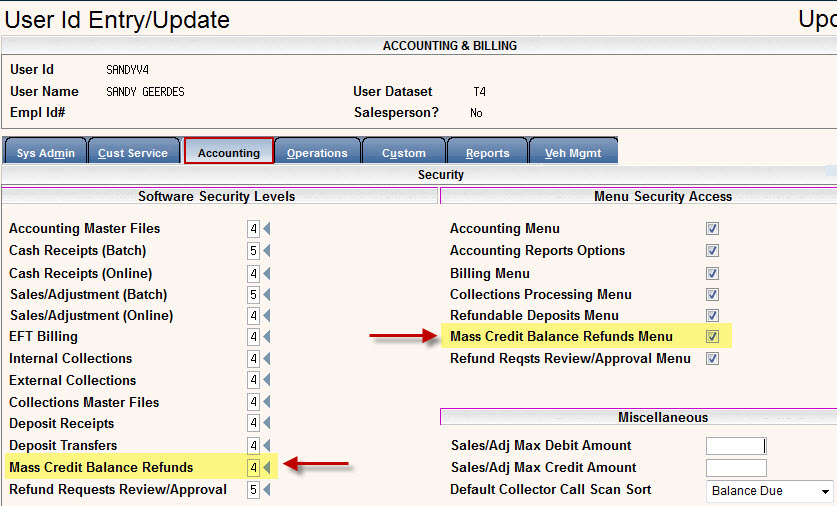
1. In the i-Pak user security file, set up the appropriate security for all users that will be utilizing this feature.
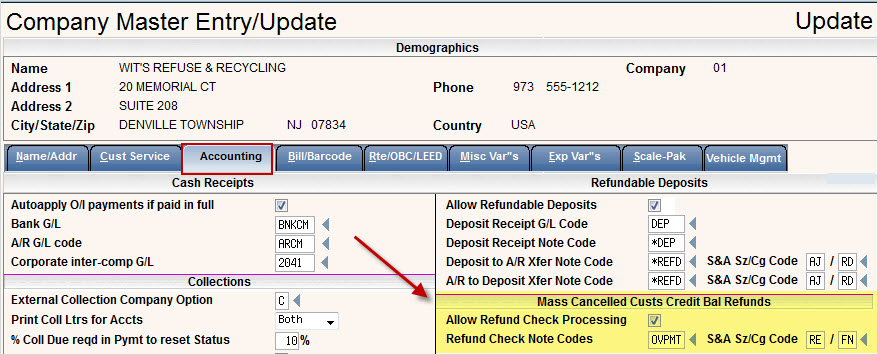
2. Create a size/charge code for the refund check debit adjustment - this will be entered in the company master
3. Create a note code that will be used for notes created on the customers’ accounts (this is optional). The note code will be entered in the company master.
4. Update the Company Master
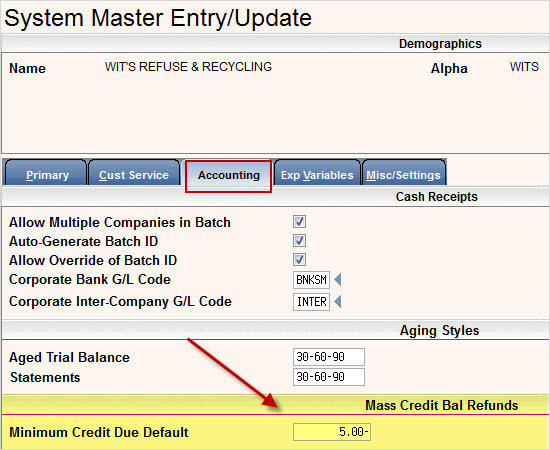
5. Update the System Master record - set the default minimum credit due for the customers to be included in the refund check batch (this can be modified during the process for a particular batch).
How it works :
From the Accounting menu, select the option for Mass Credit Bal Refunds and the i-Pak Credit Bal Refund Checks Menu will be displayed.
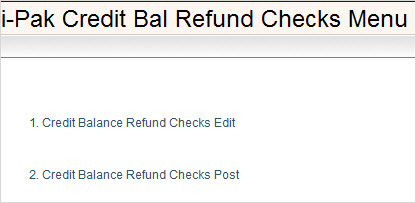
1. Credit Balance Refund Checks Edit
This option will generate an edit listing to validate the customers that will be issued a refund check.
Select the option #1 for Credit Balance Refund Checks Edit and the Refunds Checks Processing screen will be displayed.

The Refund if Balance Due is LESS THAN or EQUAL TO field will automatically be populated with the amount you entered in the System Master in step 5 above. This amount can be overridden to whatever amount you want to submit refunds for.
Enter a date into the And if Stop Date is EQUAL To or PRIOR To field.
Any CANCELLED customer that has a balance due equal to or less than the Refund amount and a Stop Date that is Equal to or Prior to the date entered, will print on the edit list for review.
Press ![]() to confirm and continue to the company selection screen.
to confirm and continue to the company selection screen.
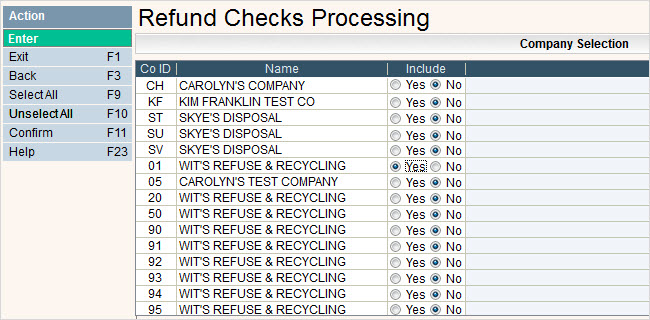
Click on Yes to put a ![]() in the circle to include the company, or No to not include the company. You can click on
in the circle to include the company, or No to not include the company. You can click on ![]() to put a
to put a ![]() in the Yes column for all companies or
in the Yes column for all companies or ![]() to put a
to put a ![]() in the No column for all companies.
in the No column for all companies.
Click ![]() to confirm and continue. The Cycle Selection screen will be displayed.
to confirm and continue. The Cycle Selection screen will be displayed.
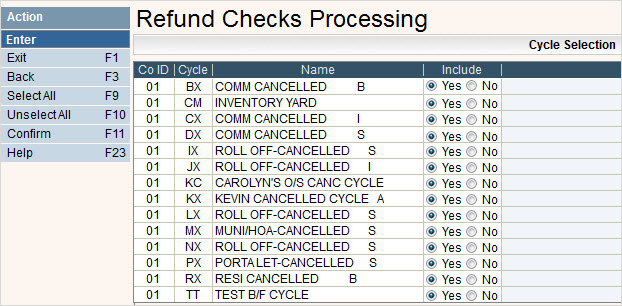
The CO (company), Cy (cycle) and Name (Cycle Description) will automatically be filled in. Select the cycles you want included in this run by clicking on the Yes option in the Include column, this will put a ![]() in the circle. If a cycle should NOT be included, you must select No - leaving this column blank is not an option. You can click on
in the circle. If a cycle should NOT be included, you must select No - leaving this column blank is not an option. You can click on ![]() to put a
to put a ![]() in the Yes column for all cycles or
in the Yes column for all cycles or ![]() to put a
to put a ![]() in the No column for all cycles.
in the No column for all cycles.
![]() Only CANCELLED cycles will be displayed.
Only CANCELLED cycles will be displayed.
When you are finished selecting the cycles, click ![]() to continue.
to continue.
A message saying your batch has been submitted will be displayed.

Press ![]() to continue.
to continue.
REPORTS
Submitting the Edit Listing will generate 2 reports.
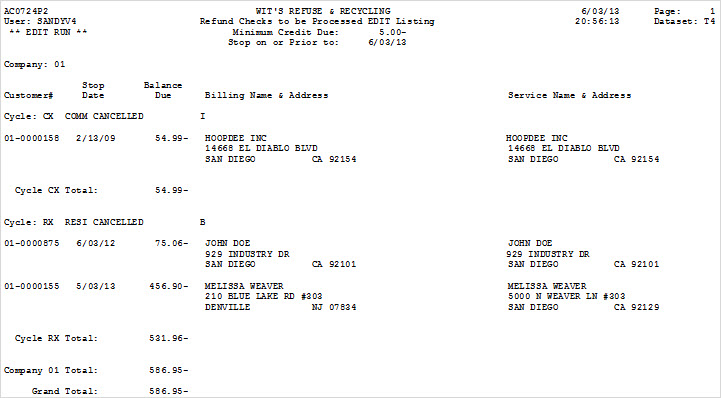
AC0724P1 - Refund Checks Exception Report
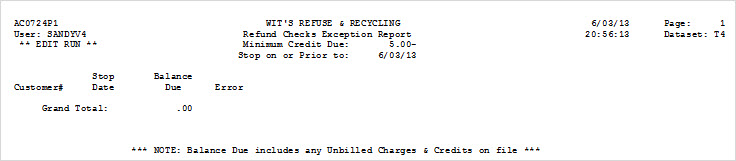
AC0724P2 - Refund Checks to be Processed Edit Listing
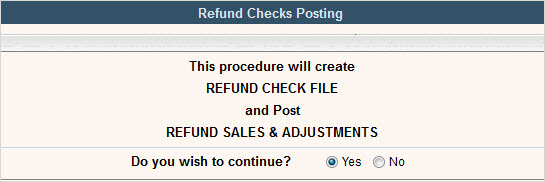
2. Credit Balance Refund Checks Post
This option will:
Creates an Outsource file for your accounts payable department in your IWSB4xx library(where xx is your data set) called Refund Check File.
POST sales/adjustments to the customer’s accounts.
Add a note to the customers accounts if a note code is specified in the company master.
Select the option #2 for Credit Balance Refund Checks Post and the Refunds Checks Posting screen will be displayed.
Click ![]() Yes and
Yes and ![]() to Continue to the Refund Checks Processing screen.
to Continue to the Refund Checks Processing screen.
The Refund if Balance Due is LESS THAN or EQUAL TO field will automatically be populated with the amount you entered in the System Master in step 5 above. This amount can be overridden to whatever amount you want to submit refunds for.
Enter a date into the And if Stop Date is EQUAL To or PRIOR To field.
Any CANCELLED customer that has a balance due equal to or less than the Refund amount and a Stop Date that is Equal to or Prior to the date entered, will receive a refund.
Press ![]() to confirm and continue to the company selection screen.
to confirm and continue to the company selection screen.
Click on Yes to put a ![]() in the circle to include the company, or No to not include the company. You can click on
in the circle to include the company, or No to not include the company. You can click on ![]() to put a
to put a ![]() in the Yes column for all companies or
in the Yes column for all companies or ![]() to put a
to put a ![]() in the No column for all companies.
in the No column for all companies.
Click ![]() to confirm and continue. The Cycle Selection screen will be displayed.
to confirm and continue. The Cycle Selection screen will be displayed.
The CO (company), Cy (cycle) and Name (Cycle Description) will automatically be filled in. Select the cycles you want included in this run by clicking on the Yes option in the Include column, this will put a ![]() in the circle. If a cycle should NOT be included, you must select No - leaving this column blank is not an option. You can click on
in the circle. If a cycle should NOT be included, you must select No - leaving this column blank is not an option. You can click on ![]() to put a
to put a ![]() in the Yes column for all cycles or
in the Yes column for all cycles or ![]() to put a
to put a ![]() in the No column for all cycles.
in the No column for all cycles.
![]() Only CANCELLED cycles will be displayed.
Only CANCELLED cycles will be displayed.
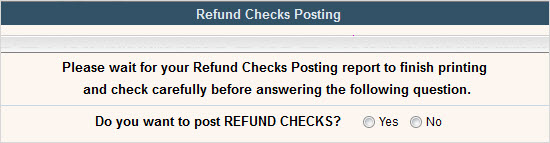
When you are finished selecting the cycles, click ![]() to continue and you will receive the following message requesting you verify your reports before choosing to continue.
to continue and you will receive the following message requesting you verify your reports before choosing to continue.
Click ![]() Yes and
Yes and ![]() to Continue.
to Continue.
A message saying your batch has been submitted will be displayed.
Press ![]() to continue.
to continue.
REPORTS
AC0724P1 - Refund Checks Exception Report (same as above, but says **Post Run**)
AC0724P2 - Refund Checks to be Processed Post Listing (same as above, but says **Post Run**)
AC0726P1 - Refund Checks Sales & Adjustment Post
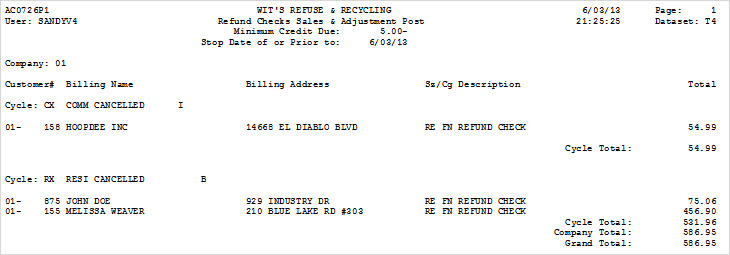
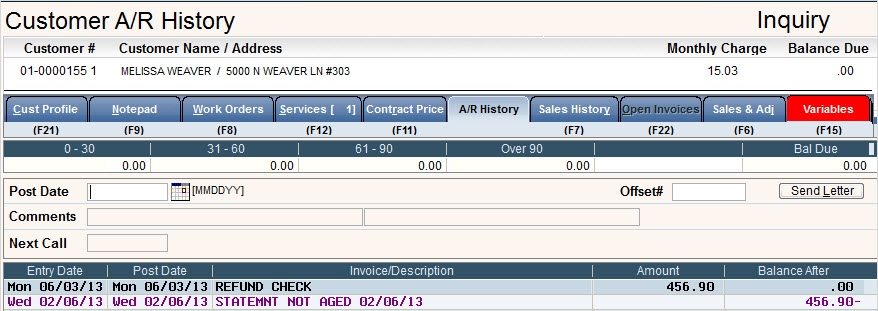
Customer Account shows Refund Check in A/R history