The Refund Request Review and Approval process allows user to submit a request for a refund and have audit trails of who approved or denied and why.
Setup
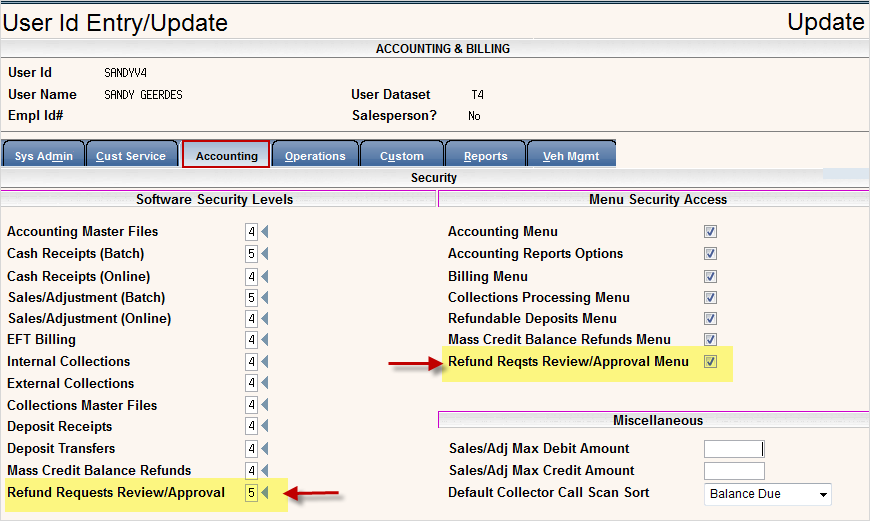
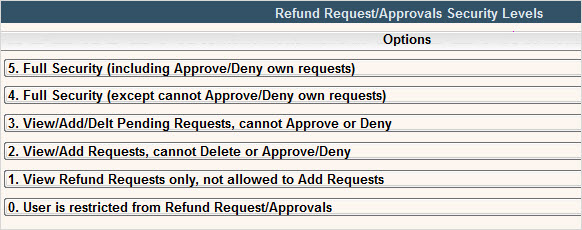
1. The first thing you need to do is update User Security to give access to the options.
2. Update the Company Master with Individual Refund Request settings
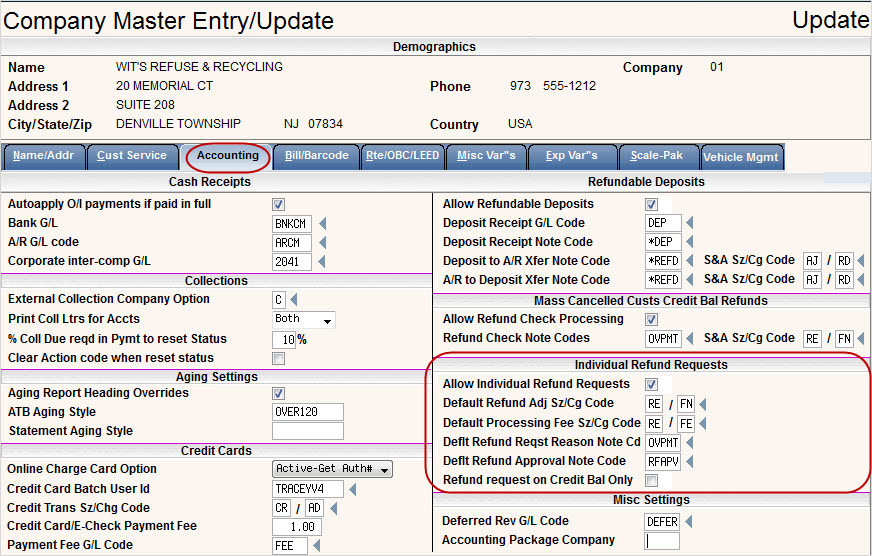
Allow Individual Refund Requests: Are you going to use Individual Account Refund Requests? Click ![]() yes.
yes.
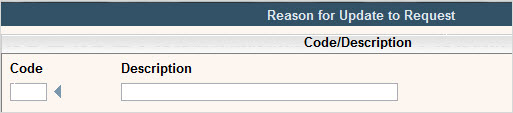
Default Refund Adj Sz/Cg Code: Enter the sz/chg code you want to use to offset the amount you are refunding on the customers account.
Default Processing Fee Sz/Cg Code: Enter the sz/chg code you want to use to assess a Processing Fee on the customers account for creating the refund check. Leave blank if your company does not charge a processing fee.
Deflt Refund Reqst Reason Note Cd: Enter the note code you want entered on the account for why the refund is being requested, when (date & time) and what user requested it. The description of the note code can be overridden at the time of the refund request.
Deflt Refund Approval Note Code: Enter the note code you want entered on the account showing that it was approved, when (date & time) and who approved it. If the refund request is being denied, then the person denying the request will select their own note code and description.
Refund request on Credit Bal only: Click yes ![]() if you want to limit the refund requests to only include accounts that have a credit balance.
if you want to limit the refund requests to only include accounts that have a credit balance.
How it works
From the Customer Profile Screen, click on Refund Request
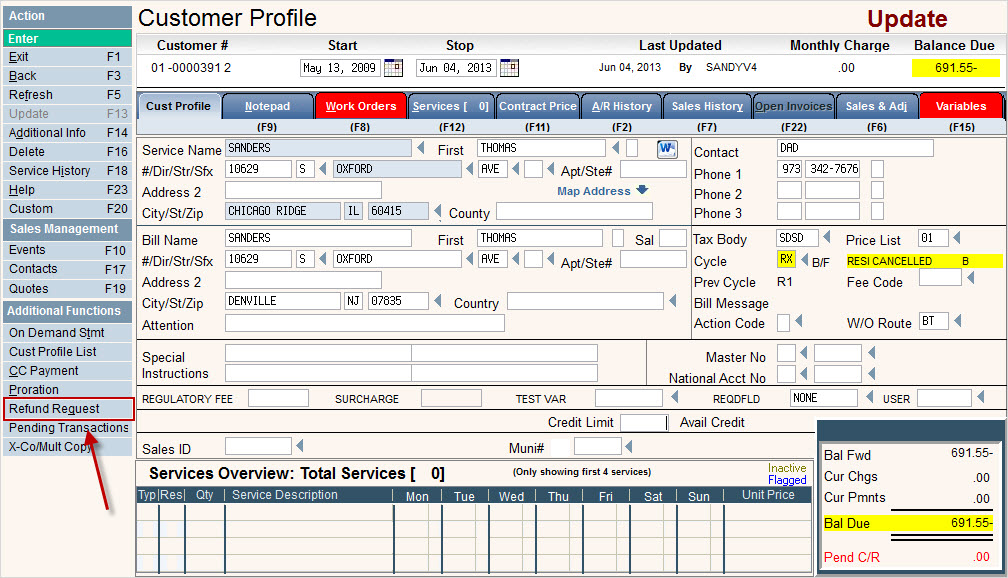
The Customer Refund Request entry screen will be displayed
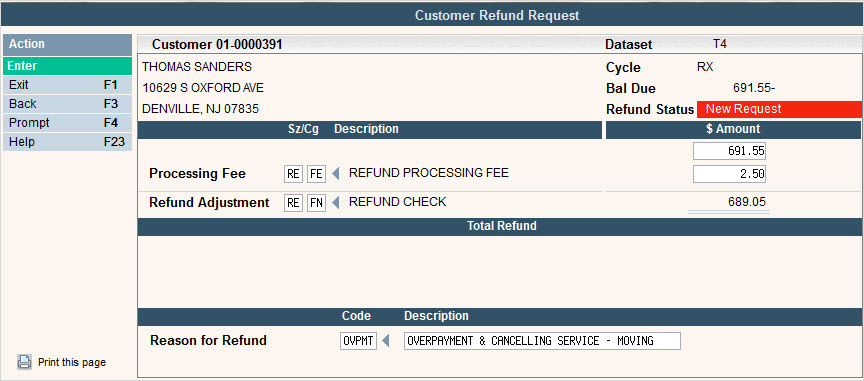
The Size/Chg and Note (Reason) codes will automatically be populated using the settings from the Company Master, but they can be overridden.
The amount of the Refund will default in from the customers Balance Due.
Press ![]() to confirm Add/Update of Refund Request and you will be returned to the Customer Profile screen.
to confirm Add/Update of Refund Request and you will be returned to the Customer Profile screen.
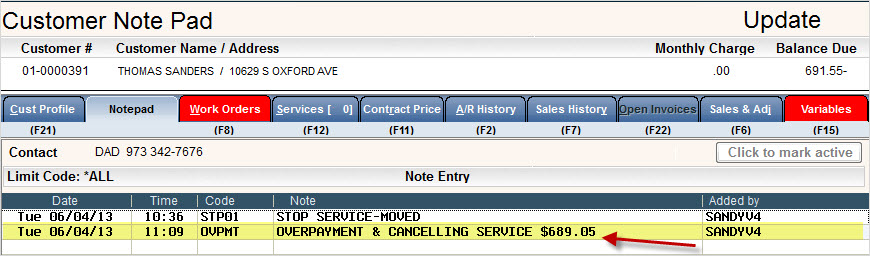
At this point a note is automatically added to the customer's note pad, indicating a refund request has been submitted.
Once the request has been submitted, Users can go to the Accounting menu and select the option Refund Rqst Review/Approve and the Refund Request Review/Approval menu will be displayed.
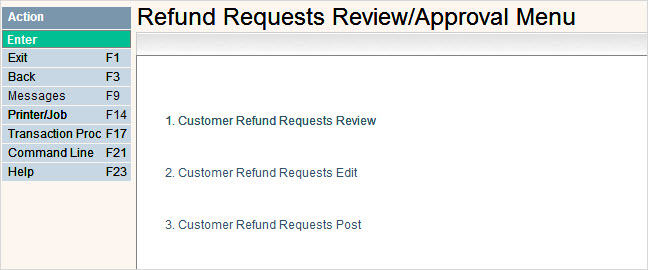
Customer Refund Requests Review
This option will show any pending refund requests.
Select option 1. Customer Refund Requests Review and the Pending Refund Requests Review Company and Cycle selection screen will be displayed.

Enter the Company you want to show pending refunds for. Leave blank to access ALL companies.
Enter the Cycle Code you want to include pending refunds in. Leave blank to show ALL cycles.
Press ![]() to continue to the Pending Refund Request Review Scan screen.
to continue to the Pending Refund Request Review Scan screen.
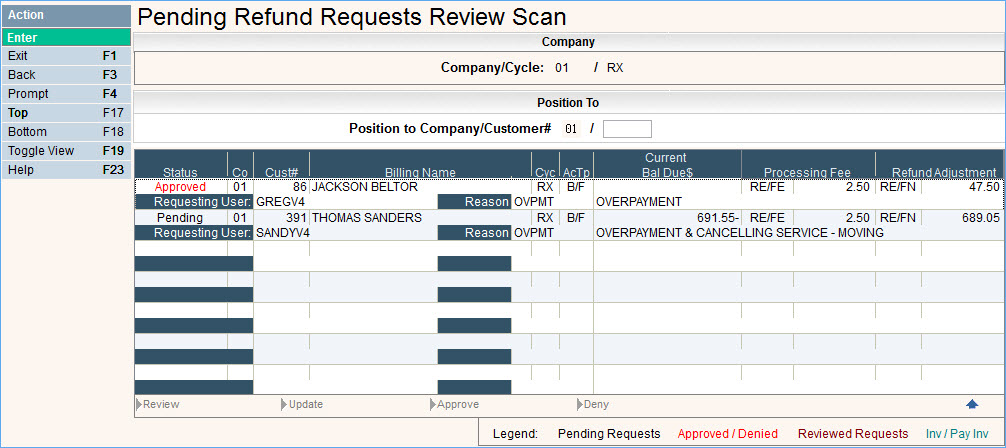
From this screen you can easily see the Status (Pending, Reviewed, Approved or Denied), Customer information, Adjustment amount, Requesting User and Reason code for why the refund request was initiated.
You can select a record by clicking on the line. You have the following options at the bottom of the scan:
Review - this will take you to the Customer Profile screen so you can review the account, notes, A/R history, etc. in order to add notes or make decision on whether or not to approve or deny the request. After you select this option, the Status will change from Pending to Reviewed.
Update - this option allows you to change or modify the request. If selected, you will be brought to the Customer Refund Request screen. If you make any changes, you will be forced to add a note with description where you can note why you made the change. This note will be marked with the User ID, Date and Time of the change.
Approve - selecting this option will change the status to Approved.
Deny - if you choose to Deny the Refund, a window will display requesting that you add a note pad code and description showing why the Refund Request was denied.

Customer Refund Requests Edit
This option will generate Edit Listings showing the Refund Requests and their current status
Select option 2. Customer Refund Requests Edit and the Refund Requests Edit Listings selection screen will be displayed.
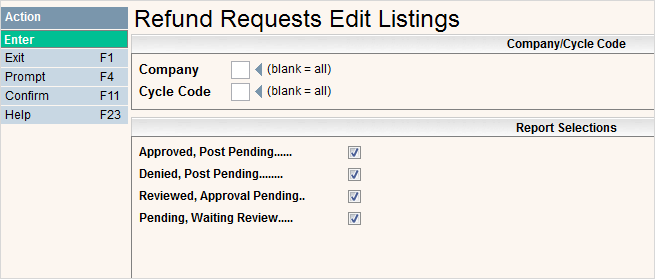
Enter the Company you want to show Refund Requests for. Leave blank to access ALL companies.
Enter the Cycle Code you want to include Refunds Requests for. Leave blank to show ALL cycles.
Select which type of reports you want an Edit Listing on by clicking ![]() on the box next to the selection item. When you have entered your selections, press
on the box next to the selection item. When you have entered your selections, press ![]() and
and ![]() to continue and generate the Edit Listings. A message saying your batch has been submitted will be displayed.
to continue and generate the Edit Listings. A message saying your batch has been submitted will be displayed.

Press ![]() to continue.
to continue.
REPORTS
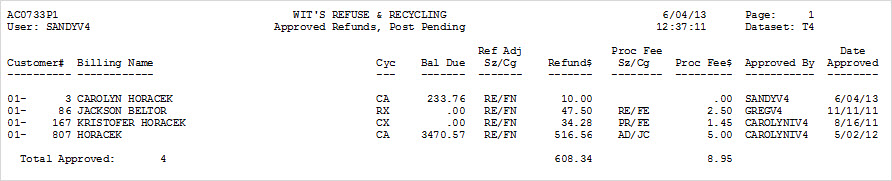
AC0733P1 - Approved Refunds
AC0733P2 - Denied Refunds

AC0733P3 - Reviewed Refunds

AC0733P4 - Pending Refunds

Customer Refund Requests Post
This option will Post any approvals and/or denials.
For approvals, a Sales & Adjustment Batch will be created with any account included in the Post, a note will be added to the customers note pad and a refund file is created for import into a payables system.
For denials, a note will be posted to the customers note pad.
Any records not approved or denied will remain in the pending refund file for review. Any records approved or denied will be removed from the file and can no longer be reviewed.
Select option 3. Customer Refund Requests Post and the Refund Requests Post selection screen will be displayed.
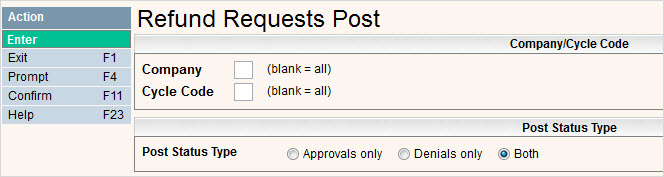
Enter the Company you want to Post Refund Requests for. Leave blank to access ALL companies.
Enter the Cycle Code you want to Post Refunds Requests for. Leave blank to show ALL cycles.
Select which type of records you want to Post by clicking on the radial button ![]() next to the selection item. When you have entered your selections, press
next to the selection item. When you have entered your selections, press ![]() and
and ![]() to continue and Post. A message saying your batch has been submitted will be displayed.
to continue and Post. A message saying your batch has been submitted will be displayed.
Press ![]() to continue.
to continue.
REPORTS
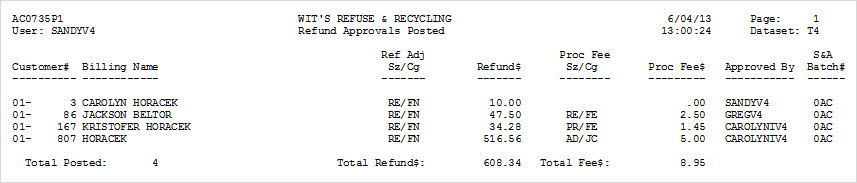
AC0735P1 - Refund Approvals Posted
AC0735P - Refund Denials Posted

Sales & Adjustment Batch
The last step in i-Pak to complete the process is to Post the Sales & Adjustment Batch. The Post report includes the Batch ID, which will be created under the User ID that submitted the Post. As a company, you should decide whether to wait to post these until after the actual refund checks have been sent to the customer, or Post them immediately.
From the Accounting menu, select Sales & Adj Edit. After reviewing the Edit list and verifying the data is accurate, select Sales & Adj Post. This will post the refunds to the customers account.
REFUNDAP File Layout
When a refund is approved, a record is added to a file that can be sent to an Accounts Payable system so that the refund checks can be generated. The File name is REFUNDAP and each time a batch of records is approved and posted, a copy of that file is created with the approved records data. These files are name REF+MMDD+SEQ#, ie REF0604001 for the batch created with the post above. All fields are separated by a comma and all alpha fields are enclosed in double quotes ("). There will be one record per customer refund that was approved.
Contact [email protected] if you need the file layout.